Hi there! Today’s post is an incredibly long and photo-heavy one. It’s about everything you need to know about nail stamping. I’ve stamped for years and I’ve accumulated quite a collection of all things stamping-related. But you don’t have to splurge – especially if you’re a beginner, or if you just paint your nails occasionally. In this case you only need for items to stamp. And most women already have one or two of the things required for stamping. So, if you want to know everything about stamping, just read on. I’ve prepared a step-by-step guide which I hope will be helpful. 🙂 Chapters 1 to 4 are about the stamping stuff you need, chapter 5 is about how to stamp, and chapter 6 is about tips & tricks. Now get a drink and maybe some food – because this post is really long!
What You Need
This is easy! Like I said, in order to stamp you only need four things: a stamper (1), a scraper (2), a stamping plate (3) and nail polish (4). Sure, you need clean up stuff – but we’re only talking cotton wool pads, q-tips and nail polish remover – and an old magazine (or something similar) to protect your workstation. OK, let’s get started!
1 The Stamper

There are lots of different stampers out there. I started with the basic round, pink stamper (1), but I bought different stampers over the years. I really love the pink stamper because it’s firm and it picks up images perfectly. This stamper is 2.3cm in diameter (I measured!), so unless you have very long talons, this stamper will definitely be big enough for you. This stamper is really great for images of all sizes – and I would recommend it to everyone – not just to newbies. 🙂 How do you clean this stamper? In 5 seconds – with a drop of nail polish remover and a q-tip.
The green stamper (2) isn’t my favourite. It’s rectangular and it’s a bit bigger than the pink one (it’s 2.6cm x 1.6cm) – but it’s curved so it’s not the best stamper for curved nails (like mine). However, it’s great for smaller (and shorter) nails and smaller images (especially if you stamp on several different images) because it let’s you see where you stamp. But if you don’t get this one in a stamping set, you don’t need to buy it separately because the pink stamper can do almost everything this stamper can do. How do you clean this rectangular stamper? In 5 seconds – with a drop of nail polish remover and a q-tip.

And then there are jelly stampers. These have become really popular over the past year or so. I bought one as soon as I found one for cheap. There are semi-firm jelly stampers (3) and ‘real’ marshmallow stampers (4). These stampers come in different sizes and colours – but the clear stamper head is one of the main reasons they’re so popular.
Now, my semi-firm jelly stamper is 2.8cm in diameter – so this one is great for very long nails. And it’s actually quite firm (which I prefer). My marshmallow stamper is 3.2 cm diameter – it’s really big. Both stampers do their job well – although both stampers seem to have trouble picking up images from some of my cheapo stamping plates. (That’s why my pink stamper will never retire!) But there are quite a few differences between the different jelly stampers. Sure, there are lots of different sizes. But the main thing is that there are sticky and non-sticky jelly stampers.
Sticky ones are recommended for starters – but honestly, I don’t think they make stamping easier (it is easy enough as it is). And once you’ve mastered the skill of stamping (you’ll do that in a few hours), you’re not a beginner anymore. So if you want a jelly stamper, I’d definitely recommend you buy a non-sticky one. 🙂 Another thing about sticky stampers is that they’re really sticky. And they will gather dust. A lot of dust! What the problem with that? Well, you cannot clean jelly stampers (sticky and non-sticky) with nail polish remover as this will damage them. Most people seem to use sticky tape to clean their jelly stampers. But I wipe my jelly stampers with a make-up remover pad drenched in facial toner. Yes, that removes all the polish easily. I’m using this alcohol-free facial toner to clean my stampers.
2 The Scraper
There are a few different scrapers out there. Scrapers are either 100% plastic – or they’re plastic with a metal blade. Don’t use the ones with a metal blade (throw them away unless you can use them somewhere around the house) because they will only scratch your stamping plates. I’ve also had different plastic scrapers. The ones that came with the jelly stampers were rubbish. But the ones that came with the round, pink stampers (the pink stamper & scraper are usually available in a set) are great.

Some of the manufacturers sell card-like scrapers. But you don’t have to buy these (we’re getting closer to one of the things you probably already have). That’s because old credit / bank / library / telephone / gift cards work perfectly as scrapers. You probably have at least one of those old cards somewhere in your wallet. 🙂
3 Stamping Plates
I don’t know how many stamping plates I have, but considering that I have sets and single plates, I know I have more than 150. Maybe even 200. But when you just start out – or if you’re still looking into whether stamping actually is for you, all you need is 1 stamping plate to practise and to play with.
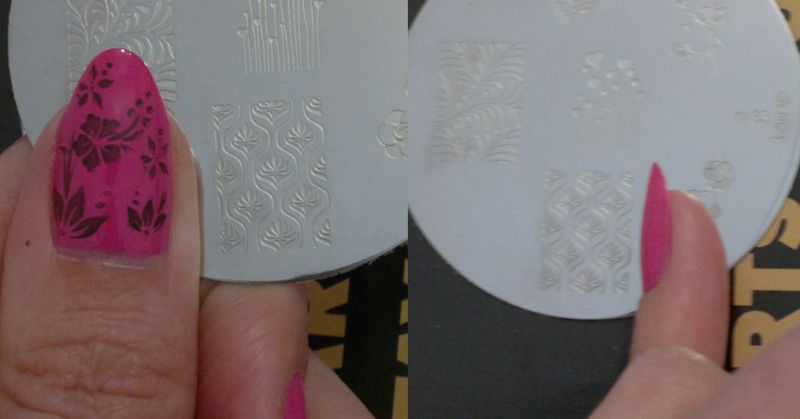
Now, let’s have a look at what kind of different plates there are! Shapes and sizes of stamping plates vary greatly. There are round, octagonal, rectangular or square plates. The regular round plates are 5.5cm in diameter (although there are bigger round plates) – but I also have a few XXL plates which are 16.3cm x 10.3cm. Yes, these plates are huge! Look at the difference!

Then there are differences in the kind of images on the stamping plates. Some plates only have French tip designs (don’t buy), some have smaller images (great for accent nails and individual and unique designs), some have full nail images (these can be tricky – I’ll explain this in the tips and tricks section), some plates have a mix of these different images, and some plates have all-over images.
I’d recommend a mixed plate with images in different shapes and sizes as your first plate. This way you can find out what you like – and what suits your nails! But then, if you want an all-over image plate, or one that features small floral images only, go and get the plate you want. 🙂
4 Nail Polish
This would be another thing I reckon most women have at home. Depending on what you want to stamp and which colours you want to use, you might actually have all that’s required! Most of us (that includes nail nuts like me) don’t need (define ‘need’…) stamping polishes in dozens of different colours. Especially not when we have certain colours already. 🙂 Saying this, Essence does an excellent white stamping polish which is £1.50 only – and yes, when it comes to stamping white onto black (or other dark colours), a regular white polish really won’t do. But then – the Essence stamping polish is dirt cheap anyway! The next pic shows what Essence’s stamping polish can do!

Whilst we’re covering colours, most black polishes will work on most base colours. It’s generally easy to stamp black onto white, yellow, pink, orange, turqouise, red, lilac… and so on. A few so-called nail gurus will tell you that you can’t use regular polishes, or that you can’t use quick-dry polishes, etc – but forget that! I’m using mainly non-stamping polishes – and at least half of them are quick-dry polishes – like the black polish you’ll see in the pics below! 🙂
And lots of colour polishes will look nice when stamped onto a white base. But not every colour polish works for stamping. You might want to test if your polishes stamp well – just try them all by stamping random images onto white paper. This will also let you practice stamping! As a general rule, when you try out your polishes for stamping, forget the ones that aren’t opaque or at least almost opaque in one coat. Polishes which require three or more coats to be opaque are simply too thin and not well pigmented – so they won’t work well for stamping. And there are polishes which your stamper really won’t pick up – in this case, just move on to the next polish.
Now, stamping lighter colours onto darker base colours can be very tricky. I do have a few polishes which work for this purpose (as you can see here) – but most of my lighter colours don’t work with darker base colours (they’re hardly visible). So you might want to try yours by stamping lighter colours on black paper. I’d generally recommend Sally Hansen’s Insta-Dri polishes because most of these look nice on darker base colours – and these polishes can often be found in discount stores. My entire Sally Hansen Insta-Dri collection came from Poundland, Poundworld and the likes.
5 How To Stamp
Make sure that your ‘workstation’ (desk, coffee table – whatever you like) is ready and that you have everything you need:
Stamper
Scraper
Stamping Plate
Nail Polish
Clean-up stuff (nail polish remover, q-tips, cotton pads)
An old magazine (or something like that) to put your stamping utensils on (so that your workstation remains clean)
Let’s start! Apply a base coat to your nails (or hardener, clear polish, etc), let it dry, then apply your chosen base colour to your nails, let it dry, and then apply a top coat (that’s optional – but if you like to top coat your nails, now’s the time to do it). OK, once you’ve got your base colour sorted and the polish on your nails has dried, you can start stamping!
Place all your stamping utensils on the magazine (or whatever you choose to cover your workstation with). Choose a stamping plate and an image. And apply some nail polish over the image you chose. (Once you get the hang of stamping you’ll only need to apply polish to one side of the image.)

Then you just ‘scrape’ away the excess polish with the scraper. You don’t have to scrape like a maniac because all you’re doing with this step is wipe the excess polish off your stamping plate. All it usually takes is one swipe (hold the scraper in a 45 degree angle) – and that’s it. But if you need two swipes, that’s fine too. 🙂 Now look at the stamping plate. There’s your image – and it’s ready to be picked up!

Take your stamper and pick up the image with a rolling motion. (But don’t just press the stamper onto the plate – that won’t work.)

Now look at your stamper. Does the image look right? If not, just stamp it on to whatever you’ve used to protect your workstation or clean the stamper with a q-tip and a drop of nail polish remover. Then try again!

If the image looks right on the stamper, well done! You’re almost there! 🙂 All you have to do now is transfer the image onto your nail. Don’t press the stamper onto the nail – but DO press your nail into the stamper – ideally with a rolling motion. You could say you’re ‘rolling on’ the image!

And now it’s done! Seriously, it’s done! The image you stamped on will dry in seconds (once you stamp it on, it actually is dry) and you’re good to go immediately! You can stamp images all over your nail(s) – but how many images you stamp on is entirely up to you. 🙂 Or you can do one accent nail only. Or use different colours… you decide! Oh, and if you stamp on skin, don’t worry. Just clean it up with a drop of nail polish remover and a q-tip.

Now, let’s recap: You apply polish to the image on the stamping plate, then you scrape off the excess polish, you pick up the image with your stamper, and then you transfer the image onto your nail. If you think this sounds quick and easy, you’re right. Once you’ve stamped a few times, this won’t take longer than five seconds (ten seconds tops) per image. I’ve stamped several different images onto all of my nails and I doubt it took longer than five minutes to do the entire mani and to clean up the stamping plates in between.
OK, now that we’re done with the mani – and before we get to the final chapter (tips & tricks), let me show you why it’s important to have something paper-like between your workstation and your stamping utensils:

You see stamping is messy – the two stamping plates I used to stamp on different images are covered in nail polish. You can also see that I wiped excess polish off the scraper several times. And there’s a used q-tip and a used cotton pad from cleaning up in between. But you know what’s great? Once the polish is dry, you just turn the page and there’s your workstation protection for the next stamping adventure. And cleaning up the utensils is easy – just read on!
6 Tips & Tricks
Before you buy stamping plates, measure your nails. It’s important to know the length of your nails because many full nail images will either be too small or too big for your nails. I’m taller than average, my hands are bigger than average and so my nails are longer than average. My nails aren’t that long at the moment, but my longest ones (as of today) are 2.3cm (thumbs and ring fingers). Whilst my nails don’t look like talons, they’re longer and bigger than average. Actually, my nails are even longer than the images on Moyou’s XL plates! So please measure your nails before buying plates with full nail images.
That’s a Konad plate. The image is really pretty – but it’s 1.6cm x 1.2 only. I can’t use this image at all – not even on my (relatively) short pinky! I guess the image would be fine for short ladies with smaller and shorter nails though. Anyway, most of these full nail images are too small for my nails – no matter what stamping plate manufacturer we’re talking about. But I generally prefer all-over stamping plates or plates with smaller images which I can combine as I see fit. 🙂 In any event, measure your nails!
Top coat your nails before you stamp (optional) – but don’t apply top coat on top of the stamped images. Again, some nail gurus will tell you that you need to ‘seal your design’ (rubbish), and I’ve even read about special stamping top coats. But don’t worry – you’ll have tip wear and the polish will start to chip long before the stamped-on images show any weaknesses. But if you really, really want to apply a top coat, try to top coat each nail with one swipe (this won’t work on long and big nails) and with as little pressure or force as possible. Don’t drag the top coat over your nails because this will ruin the image. And you might not want to use actual top coat, but simple clear polish (in my experience the regular clear ones are better than the quick-dry ones).
And here’s the coolest bit – cleaning up after stamping. I’ve shown you that stamping is a messy thing. And your stamping stuff needs to be cleaned with a cotton pad drenched in nail polish remover. I recommend you don’t try to clean your utensils after you’ve done your mani because you will end up with cotton pad fluff on your nail tips – no matter how careful you are, you’ll have fluff on at least one nail. And that’s the best case scenario. So I’d say do what I do – leave the stamping stuff until you do your next mani. So when you remove your nail polish, you just clean the plate(s) and the scraper at the same time. If you want the stamping stuff cleaned right away, ask your partner / spouse / kid for help. 🙂
And that’s it! At this point I want to thank you for reading this! You’ve been patient. Very patient. And you deserve praise! I’ve read the entire post about 20 times – but hey, that’s how it works. 🙂 Again, if you read this post – or even half of it, thank you!

Love this x
LikeLiked by 2 people
Thank you so much! xx
LikeLiked by 1 person
I’ve never stamped before but I did buy an inexpensive stamping kit (this thing: https://www.amazon.ca/New-Salon-Express-Nail-Stamping/dp/B00EB6AY8M)
I think the stamper I have it rounded too but not sure if it’s “marshmallow” or sticky… I think it’s sticky? I’ve had this kit for YEARS and it’s collecting dust under my bed! 😆
Hmm so you don’t put any top coat on your nails? I use a fast dry top coat and it’s essential to keeping my mani fresh for the week I keep my mani.
This is a SUPER helpful post!!! You should make this a sticky. I’ll follow your tips when I finally try out my kit! Maybe I will do a “newbie tries stamping for the first time” post lol.
LikeLiked by 2 people
Thank you sooo much, stashy! Mwah! xx
I think the stamper you’ve got is a nice, firm one – not a diva stamper. 🙂 I also don’t think it’s a sticky stamper – these are fairly new so if you’ve had your stamping kit for years, you’re safe. 😉
Just try out your stamping kit. Take a piece of paper and try out your polishes for stamping – and at the same time you can practice stamping. Just try it. 🙂 Any questions or issues, let me know.
About top coats… sometimes I do apply top coat and sometimes I don’t. When I do a foil mani, I slather my nails in top coat because if I don’t, the mani won’t last half a day and I’ll end up with micro sparkle everywhere (face, clothes, furniture…). But when I stamp, I never use top coat or clear polish after I’ve stamped. I’ve tried this in the past, and I even managed to top coat 8 out of 10 nails without smudging anything – but then there would be 2 nails that looked off.
I rarely use quick-dry top coats. They usually shrink the polish and give me a tip wear look. I really prefer regular clear polish. But iit’s great quick-dry top coats work for you, especially if they make your mani last for an entire week.
Now, unpack your stamping kit and stamp… 🙂
LikeLiked by 1 person
I’ll devote some time over the upcoming long weekend to play around, I think! 😛
LikeLiked by 2 people
Yay! If you just want to practise the actual stamping, stamp on paper.This will also give you the chance to test your polishes for stamping. Let me know how it works out. xx
LikeLiked by 1 person
Amazing tutorial. I always love the way these look on your nails. I don’t own any of these and so I have never tried it, but this is making me so curious. Any brand of stamping plates you love in particular?
xo Anne
LikeLiked by 2 people
Thank you sooo much! xx
I think my favourite stamping plate set is Pueen’s ‘Stamping Buffet’ (24 plates). Beautiful images – and so many to choose from!
My second favourite set is Pueen’s Love Elements. I remember gifting this set to myself when it was launched three years ago. 🙂
I’ve got all sorts of stamping plates and sets and I think I’d recommend either one of these Pueen sets to a newbie because you’ll have lots of different plates and images to play with (endless fun!!) – and you’ll get a lot of plates for your money. I know I bought the Love Elements set for under £20, and the Stamping Buffet for around £20 – so I paid less than £1 per plate.
In comparison, there are brands like Konad (I think they were the first to do stamping plates) who charge £6 for a single stamping plate.
I think MoYou London plates are nice too. It’s hit or miss with Bundle Monster plates. And the no-name plates… some are great, some aren’t, some are just knock-offs…
If you want to start stamping, get Pueen Love Elements or Pueen Stamping Buffet. And you can find cheap stampers online – I really love the pink stampers (I’ve got a few of them) because they ALWAYS pick up images perfectly.
Another thing you might consider is buying a random stamping plate set (usually 10 plates) that comes with a stamper & scraper. These sets can be found for under a fiver on ebay and the likes. The disadvantage is that you don’t know what kind of plates you’re getting – and my guess is that these plates are so cheap because they were never really popular (i.e. country flags, football-themed, etc).
If you buy stamping stuff, let me know. Any questions or issues, let me know. 🙂
LikeLike
Wow the work you’ve put into this post! Great for everyone who wants to get into stamping but doesn’t know how. I remember the frustration I felt when it didn’t “work” for me. But glad I didn’t give up. Shamping is so much fun! ♡♡
LikeLiked by 1 person
Thank you so much!! Yes, it took me a while to write this post. I kept adding more and more bits until I was satisfied I covered the basic bits (tools, how to, basic tips & tricks).
It’s great you didn’t give up stamping. You really do awesome manis. 🙂
LikeLiked by 1 person
Very nice of you to put all this into a single post. Really wished that I had something like this when I first started. I didn’t even know I needed special polishes! Hehe the frustration!
Thank you so much for liking my manis! I’m still a learner and just love how much variety there is to Nail art!
LikeLiked by 2 people
Thank you hun!
I too would have loved a tutorial and some advice / tips & tricks when I started stamping. I hope mine will help someone since it includes quite a few things I had to figure out myself.
And I really like your manis! Very creative and really, really well done! My manis go wrong sometimes (oh dear!), but that’s the way it is. Doing manis is a constant learning process. Sometimes a mani turns out ten times better than imagined, and sometimes a mani just looks ridiculous. Sometimes I do nail fail posts (wait for next week…) – hoping I’ll learn from my mistakes, and maybe I can give someone a laugh! 😀
LikeLiked by 1 person
I question myself sometimes, the design did look better in my head haha! One good thing with manicures, if you don’t like it, you can change it instantly. (As long as you have a bottle of acetone! 😉 mine just came through the post) looking forward to reading your posts xx
LikeLiked by 3 people
Thank you, hun. xx
I’m looking forward to follow your nail adventures as well. 🙂
LikeLiked by 1 person
Great tutorial, thanks for sharing. They are so cute, I’d like to try to make one 🙂
LikeLiked by 3 people
Try it! It’s awesome fun! 🙂
LikeLike
What a hugely useful tutorial – I’ve never been able to quite master stamping, so I’m definitely gonna take away some of your tips and have another go X
LikeLiked by 2 people
Thank you so much! You really should give it another go. I remember the first time I stamped. It worked out brilliantly and I thought, ‘this is easy’. The next five times or so everything went wrong but I didn’t give up because I knew I did it once. And then I just stamped, stamped, stamped…
So yeah, try it. Any issues or questions, let me know. xx
LikeLike
Pingback: Nail Of The Day – Orly Basket Case & Stamping | Mrs Strawberry Blonde
Reblogged this on and commented:
always wanted to do nail stamping the right way! found this brilliant post and had to share, hope you enjoy 🙂
LikeLike
Great post! Lots of really good info! Thanks!
LikeLiked by 1 person
Glad you liked it. Any issues, let me know. 🙂
LikeLiked by 1 person
Thank you! Have a great weekend!
LikeLiked by 1 person
Thank you. You too! 🙂
LikeLiked by 1 person
Pingback: My First Try at Nail Stamping | thoughtfulpigeon
Pingback: Nail Of The Day – Astor Fashion Studio 138 & Stamping With Pueen 74 | Mrs Strawberry Blonde
Ok this is really informative! Literally answers every question I have lol. Nice to know that not all stamping plates are for every nail size as everyone is different.
Thanks for sharing this post with me!
LikeLiked by 1 person
Thank YOU!
I’m glad you found this tutorial helpful. xoxo
LikeLiked by 1 person
Pingback: Nail Of The Day – Sally Hansen Complete Salon Manicure Ion & Stamping With Sugar Bubbles 031 | Mrs Strawberry Blonde